All guides
No guide matches your search.
Add menus, toolbars, context menus and a status bar
Define your commands once in MxCommandManager, show them in a menu bar, a toolbar and a context menu, and add an MxStatusBar with text, progress and a slider.
On this page
Command bars are classic menus and toolbars. MxCommandManager owns the commands. MxCommandBar shows them as a menu bar or a toolbar, and MxContextMenu shows them on a right click. The same command can sit in all three places. When you change it once, every copy follows.
These types are in Mordex.Windows.UI.CommandBars. The status bar is in Mordex.Windows.UI.StatusBar.
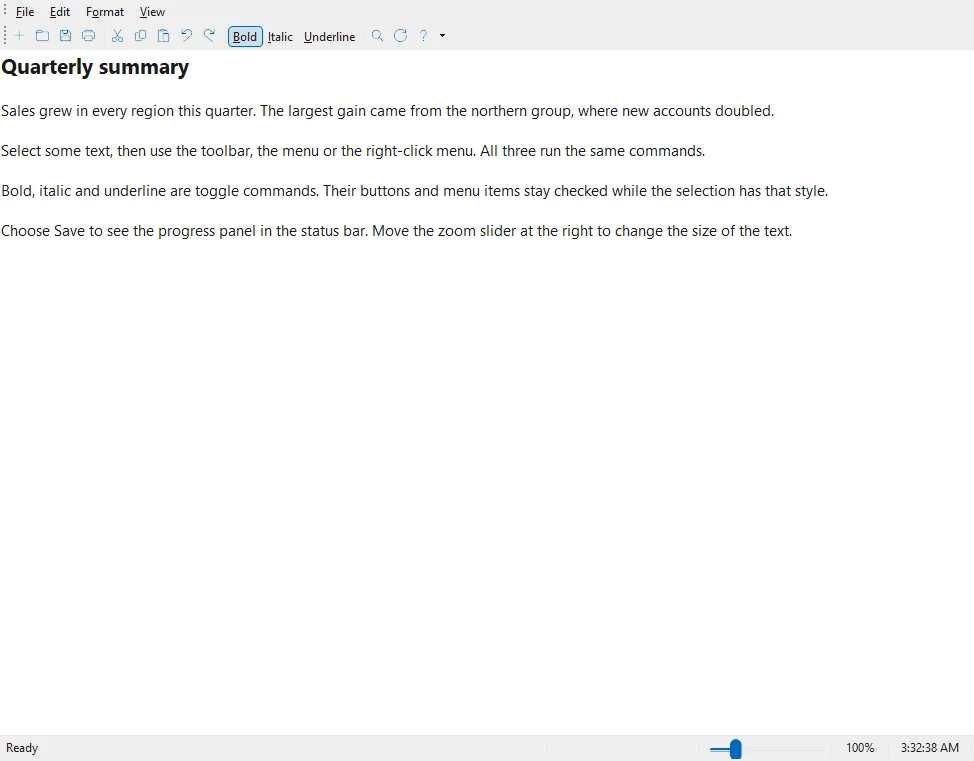
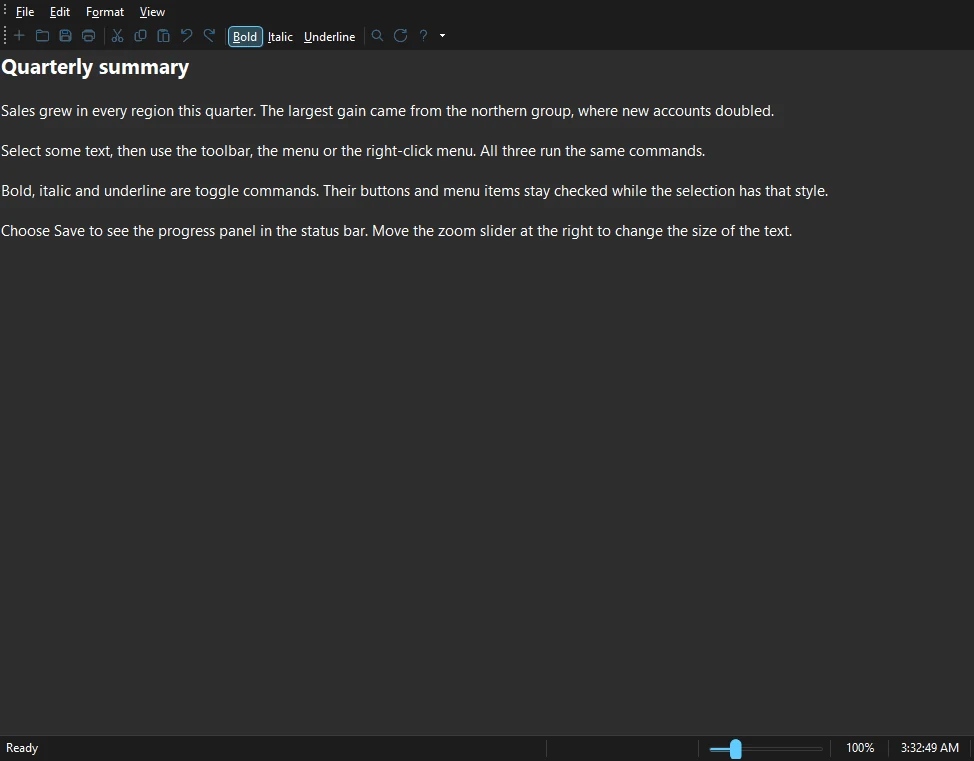
Menu bar, toolbar and status bar
Set up the command manager
Create an MxCommandManager and set ContainerControl to the form or panel that holds the bars. The manager docks its bars inside that control. Give it an image list for small icons and one for large icons.
using System.Windows.Forms;
using Mordex.Windows.UI;
using Mordex.Windows.UI.CommandBars;

MxCommandManager manager = new MxCommandManager();
manager.ImageList = smallImages;
manager.LargeImageList = largeImages;
manager.ContainerControl = this;
In Visual Studio you can drop MxCommandManager on a form and edit the commands and bars in its designer dialog.
Define commands
An MxCommand takes a key, a text, an image index and a shortcut key. Add each command to manager.Commands and handle Click.
MxCommand save = new MxCommand("Save", "&Save", 2, Shortcut.CtrlS);
save.ToolTipText = "Save";
save.Click += (sender, e) => SaveDocument();
manager.Commands.Add(save);

MxCommand cut = new MxCommand("Cut", "Cu&t", 4, Shortcut.CtrlX);
cut.Click += (sender, e) => editor.Cut();
manager.Commands.Add(cut);
The & marks the letter that the user can press with Alt. Set LargeImageIndex when the large icon has another index. A command with no image looks best with CommandStyle = CommandStyle.Text.
Make a toggle command
Set CommandType to CommandType.ToggleButton. Each click then switches Checked between InheritableBoolean.True and InheritableBoolean.False.
MxCommand bold = new MxCommand("Bold", "&Bold", -1, Shortcut.CtrlB)
{
    CommandType = CommandType.ToggleButton,
    CommandStyle = CommandStyle.Text
};
bold.Click += (sender, e) => ToggleBold();
manager.Commands.Add(bold);
You can also set Checked in code, for example when the selection in an editor changes. IsChecked gives the state as a bool.
Add a menu bar
Create an MxCommandBar with the manager and a key. Set CommandBarType to CommandBarType.Menu. A top menu such as File is a command with child commands in its Commands collection.
MxCommandBar menuBar = new MxCommandBar(manager, "MenuBar")
{
    CommandBarType = CommandBarType.Menu,
    DockStyle = BarsDockStyle.Top,
    FullRow = true,
    CommandsStyle = CommandStyle.Text
};

MxCommand file = new MxCommand("File", "&File");
file.Commands.Add(new MxCommand(save));
file.Commands.Add(new MxCommand(print));
menuBar.Commands.Add(file);
new MxCommand(save) makes a copy that is linked to the save command in the manager. A click on the copy also raises Click on save. FullRow makes the bar fill its row.
Add a toolbar
A toolbar is an MxCommandBar with CommandBarType.ToolBar. Its Text is the name that the user sees. Add linked copies of the commands and use AddSeparator between groups.
MxCommandBar toolBar = new MxCommandBar(manager, "ToolBar")
{
    CommandBarType = CommandBarType.ToolBar,
    DockStyle = BarsDockStyle.Top,
    Text = "Standard"
};
toolBar.Commands.Add(new MxCommand(save));
toolBar.Commands.AddSeparator();
toolBar.Commands.Add(new MxCommand(cut));
toolBar.Commands.Add(new MxCommand(bold));
DockStyle puts the bar at Top, Bottom, Left or Right, or makes it Floating. The user can drag bars to other places. Set manager.LockCommandBars to true to stop that.
Add a context menu
Create an MxContextMenu with the manager and a key. Fill it with linked copies. Then attach it to a control with SetContextMenu. The menu opens when the user right clicks that control.
MxContextMenu menu = new MxContextMenu(manager, "EditorMenu");
menu.Commands.Add(new MxCommand(cut));
menu.Commands.Add(new MxCommand(copy));
menu.Commands.Add(new MxCommand(paste));
menu.Commands.AddSeparator();
menu.Commands.Add(new MxCommand(bold));

manager.SetContextMenu(editor, menu);
You can also open the menu yourself with Show, for example menu.Show(editor, point).
Enable and disable commands
Set Enabled on the command in the manager. The menu item, the toolbar button and the context menu item change together.
InheritableBoolean state = hasSelection ? InheritableBoolean.True : InheritableBoolean.False;
cut.Enabled = state;
copy.Enabled = state;
Visible works the same way. IsEnabled and IsVisible give the result as a bool.
Change how the bars look
These properties of MxCommandManager apply to all bars:
| Property | What it does |
|---|---|
CommandsStyle | Shows commands as Image, TextImage or Text. |
View | Shows SmallIcons or LargeIcons. |
ShowToolTips | Shows the ToolTipText of a command when the mouse rests on it. |
ShowShortcutInToolTips | Adds the shortcut key to the tooltip. |
LockCommandBars | Stops the user from moving the bars. |
A single MxCommandBar has its own CommandsStyle and View too.
The command bars follow the application theme. See Themes.
Let users customize the bars
Call ShowCustomizeDialog to open the dialog where the user can change the bars. To keep their changes, save the layout to a stream when the form closes and load it again at start.
using System.IO;

using (FileStream stream = File.Create(layoutPath))
{
    manager.SaveLayoutFile(stream);
}

using (FileStream stream = File.OpenRead(layoutPath))
{
    manager.LoadLayoutFile(stream);
}
Add a status bar
MxStatusBar shows a row of panels at the bottom of a form. Each panel is an MxStatusBarPanel in the Panels collection. A Key lets you find a panel later with Panels["key"].
using Mordex.Windows.UI.StatusBar;

MxStatusBar status = new MxStatusBar { Dock = DockStyle.Bottom };

MxStatusBarPanel message = new MxStatusBarPanel("Ready")
{
    AutoSize = StatusBarPanelAutoSize.Spring,
    Key = "message"
};
MxStatusBarPanel clock = new MxStatusBarPanel
{
    Width = 80,
    Alignment = HorizontalAlignment.Center,
    Key = "clock"
};

status.Panels.Add(message);
status.Panels.Add(clock);
Controls.Add(status);
AutoSize controls the width. Spring fills the free space. Contents fits the text. None keeps the Width you set. Change Text to update a panel. ToolTipText adds a tooltip.
Choose a panel type
PanelType sets what a panel shows.
| Value | What the panel shows |
|---|---|
Item | Text and an image. This is the normal panel. |
ProgressBar | A progress bar. Use ProgressBarMinValue, ProgressBarMaxValue and ProgressBarValue. |
ControlContainer | Any control you put in Control, such as a slider. |
ToggleKeyState | The state of a key from ToggleKeyValue, such as CapsLock or NumLock. |
This example adds a progress panel and a zoom slider.
using Mordex.Windows.UI.Controls;

MxStatusBarPanel progress = new MxStatusBarPanel
{
    PanelType = StatusBarPanelType.ProgressBar,
    Width = 150,
    ProgressBarMinValue = 0,
    ProgressBarMaxValue = 100
};

MxTrackBar zoom = new MxTrackBar { Minimum = 50, Maximum = 300, Value = 100 };
MxStatusBarPanel zoomPanel = new MxStatusBarPanel
{
    PanelType = StatusBarPanelType.ControlContainer,
    Width = 130,
    Control = zoom
};

status.Panels.Add(progress);
status.Panels.Add(zoomPanel);

progress.ProgressBarValue = 40;
React to clicks on a panel
PanelClick and PanelDoubleClick give you the panel in e.Panel.
status.PanelClick += (sender, e) =>
{
    if (e.Panel.Key == "clock")
    {
        ShowCalendar();
    }
};
Note
Mordex.Windows.Ribbon has its own StatusBarPanelAutoSize enum. When a file uses both namespaces, write the full name Mordex.Windows.UI.StatusBar.StatusBarPanelAutoSize.
For a status bar in the ribbon style, use MxRibbonStatusBar. See Build a ribbon.
Was this page helpful?